Operating Systems
You may already be familiar with the term “operating system”. It’s the thing that usually comes pre-installed when you buy a new computer. Apple’s OS X and Microsoft’s Windows are probably the ones you’ve heard of. But what are they?
An operating system or OS is a collection of programs that makes a computer practical to use.
I admit that this definition is pretty vague. But the main point here is that a kernel alone is not an OS. A kernel is an essential part of every modern OS, but on its own it does basically nothing—it needs other programs to run in order to be really useful. So an operating system is really just a kernel plus those “other programs”. But which other programs? That varies between different OSes and is often a selling point for the companies that make them. Some common inclusions are a program for managing separate user accounts, a program for finding and organizing files, programs for opening common file formats like text and video, a web browser, things like that.
Next we’re going to play around with an OS to really get a feel for how they work. But we need to do a little preparation so that you can follow along with the book easily.
Virtual Machine
It would be great if you could just start fooling around on your own computer in order to learn about being a superuser, but I’m afraid that wouldn’t be very responsible of me. It’s easy to screw things up as a superuser—especially an inexperienced one—and I wouldn’t want you damaging your property on account of me. Also I don’t know what kind of computer you’re using so it’s hard for me to give you any specific tips. So for this chapter we’re going to use one standard computer with a standard OS so that everyone gets the same experience. As a bonus, this standard computer also lets us save our work in case anything goes awry. Don’t worry though: you don’t need to go out and buy a new computer.
Instead you will download a computer. This is (surprisingly) easy to do thanks to Turing completeness. All you need is a program which simulates a computer inside your actual computer.
A simulated computer is often called a virtual machine or VM because it exists only in the digital memory of your computer. But other than that it works just like a normal one.
The program we’re going to use to do this is VirtualBox, a free and open source VM manager. Steel yourself for possibly the hardest exercise in the book so far:
Install and configure VirtualBox. Hint: the VirtualBox User Manual has sections on installing and starting VirtualBox
Once you have that installed, we’re going to create a computer (a virtual machine) to play around with.
Open VirtualBox and click the big blue button at the top left that says “New…”. Give it whatever name you want and then choose “Type: Linux” and “Version: Arch Linux (64-bit)”. Click “Next”. Now VirtualBox will walk you through a few choices about what kind of virtual machine you want; the defaults will work just fine for us so this is pretty easy:
- For “Memory Size”, the default is fine. Just click “Next”.
- For “Hard Disk”, the default is fine. We want VirtualBox to create a virtual hard disk where our virtual machine can store its files. Click “Create”.
- Click “Next” to accept the default hard disk file type.
- Click “Next” to accept that storage will be dynamically allocated
- And finally click “Create” to accept the name and size of the virtual disk
Once you finish, notice that your new virtual machine has appeared in the left panel. Left’s give it a spin: click your virtual machine in the left panel and then click the big green “Start” arrow at the top.

Once you start your virtual machine, you might find that suddenly your mouse and keyboard have stopped working! This is just a VirtualBox feature called “mouse capture”. This traps the mouse and keyboard input in the VM so that you don’t accidentally click or alt-tab outside of the VM while you’re trying to work. To get your mouse and keyboard back, you can press the button indicated in the lower right of the VirtualBox window. For me it’s the Ctrl key on the right side of my keyboard.
Now VirtualBox will pop up a window saying “Select start-up disk” but we don’t care about this right now so just click “Cancel”. A new window has opened: this represents the monitor of your VM. And after a few seconds… tragedy. Something FATAL has occurred. But we have actually learned enough already to understand what has gone wrong.
We know that the most important program on a computer is its kernel since it’s the program that we use to run all other programs on the computer and manage all of the hardware connected to the computer. But we haven’t provided a kernel for our computer to run! In particular, the virtual machine is complaining that it didn’t find any “bootable medium”. “Medium” here is just a generic term for data storage; it could be a hard disk drive, solid state drive, DVD, CD-ROM, floppy disk, etc. “Bootable” is refering to a process called “bootstrapping”.
Bootstrapping (as in “pulling yourself up by your own bootstraps”) is when a simpler program is used to run a more complicated program. It is usually shortened to just booting. That simpler program is called a boot loader.
See, a kernel is usually such a huge and complex program that your computer’s BIOS isn’t sophisticated enough to get it running (recall that the BIOS is the component of the motherboard responsible for starting your computer). Instead you need a simpler program called a boot loader which the BIOS can run and it is the boot loader that gets the kernel running. So the error message we see here is the BIOS complaining that it searched all of the storage devices attached to the virtual machine and couldn’t find any that had a boot loader on them.
We’ll solve this problem by downloading an operating system. Every OS includes a boot loader and a kernel, so that will get us past this particular problem.
Go to archlinux.org and download Arch Linux. If you’re feeling up to a challenge, you can use the recommended BitTorrent download. Otherwise just scroll down and use one of the HTTP direct downloads.
The Arch Linux download includes a .iso file. This file represents a generic
storage medium—like the kind our BIOS was looking for—containing a boot
loader and the Arch Linux operating system. Now let’s hook it up to
the virtual machine in VirtualBox.
First make sure you shut down your virtual machine. Close the window representing the virtual monitor, choose to shut down the machine, and click OK.
- Click on your virtual machine in the left pane and click the big yellow “Settings…” gear at the top.
- Click “Storage”. This is where we add virtual storage devices to our virtual machine.
- Click “Empty” underneath “Controller: IDE”. This represents your virtual machine’s empty virtual CD/DVD drive.
- On the right of this window is a little CD/DVD image with a down arrow, click this and select “Choose virtual optical disk file…”
- Browse to wherever you downloaded the Arch Linux
.isofile and choose it. - Close the settings by clicking “OK”.
Once again, click the big green arrow to start the machine. Something different has happened! The BIOS automatically detected a boot loader on our virtual CD drive so we’re now looking at the interface for the Arch Linux boot loader. We have several options, but we just want the default one: “Boot Arch Linux (x86_64)”, so hit Enter. A bunch of text will fly by the screen as first the boot loader gets ready to run the kernel and then more text as the kernel takes over and starts even more programs running.
Eventually you’ll reach a screen looking something like this
Arch Linux 3.19.3-3-ARCH (tty1)

archiso login: root (automatic login)
root@archiso ~ # _
This is what success looks like. The VM has booted successfully and we are now running the Arch Linux operating system!
If the VM’s window turns completely black, this is just the virtual monitor trying to save power. Clicking in the window and pressing any keyboard key should wake it up.
UNIX

This virtual machine is running an OS called Arch Linux which (you might guess) uses Linux for its kernel. Linux is based on the kernel of an old OS called UNIX which was developed by AT&T in the 70s. UNIX no longer exists as such, but it lives on today through the many OSes which imitate it, including the Linux and XNU-based OSes. These OSes try to be as UNIX-like as possible and are often reffered to as just *nix, meaning “some variety of OS that works kinda like UNIX”. So even though we’re working with Arch Linux specifically, many of the things you will learn here will apply to many other OSes.
Except for Windows. Microsoft likes to be arbitrarily different whenever possible, so most of the things in this chapter will not work as-is on a Windows computer. Despite that, Windows does have some things in common with UNIX conceptually, so the general principles from this section still apply.
Cygwin is an open source project that tries to make Windows more UNIXy. If you like what you learn in this chapter and are stuck with Windows, Cygwin can be a practical way to apply your knowledge.
The screen we’re at right now is telling us that the name of this operating
system is archiso and we are logged in as a user called root. Arch Linux is
a multi-user OS, meaning that it is designed for multiple people to use the
computer simultaneously. So any work that you do on the computer has to be done
after logging in with a certain user name. Normally you would have your own user
name just for you, but in this case the computer has automatically logged us in
as the root user. This isn’t an ordinary user we’re logged in as: root is
the superuser!
The reason why we’re the superuser is because right now we’re actually running what is called a “live” operating system: the Arch Linux boot loader copied the operating system’s instructions from the virtual CD into our virtual machine’s RAM. Recall that that is the memory that is wiped whenever the computer is restarted. This is handy because it lets us run an operating system without making any permanent changes to the computer we are running on.
The idea is that while we’re running in this temporary live OS, we use the superuser’s account to copy the operating system to a location that isn’t temporary (such as the hard disk drive). The superuser is helpful for this because non-superusers normally can’t modify all aspects of a computer’s hard drives.
But we don’t have to worry about that right now. For the stuff we’re going to do in this and the following chapters, the live OS is sufficient.
So we’re logged in as the superuser and ready to roll. First, let’s install some additional tools that weren’t included with the Arch Linux downoad.
Type the following commands into your virtual machine, typing the correct capitalization and spacing is important:
pacman -SyEnter. You should seeSynchronizing package databases...and then some loading bars. Wait for them to finish.pacman -S hexedit gcc rubyEnter. You will see some output printed and then it will pause atProceed with installation? [Y/n]. Hit Enter again. Wait for the progress bars to finish again.
Before I start explaining more, let’s become familiar with VirtualBox’s ability to save and load our work. This will be handy moving forward in case you screw something up and want to return to an earlier state where things were working. Simply click “Take Snapshot…” in the “Machine” menu of the VM’s window. You can give your snapshot a name and a description to remind yourself later why you saved your work, then click OK. After a short wait, you should be back to the VM as though nothing happened. But what just occured is VirtualBox created a file storing all of the information about the current state of the VM.
Now to really appreciate how useful snapshots are, type in the following and then press Enter:
rm -rf --no-preserve-root /
If you get a message like “unrecognized option” or “command not found” or it
just prints another root@archiso ~ # line right away, you probably typed it
wrong. Just carefully try again.
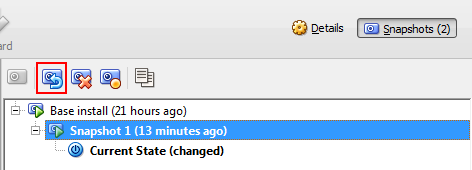
As lots of text starts flying across the screen, you might be wondering, “What did I just do?” Well, right now Arch Linux is happily destroying itself. And by now it has probably already damaged itself beyond repair. Fun! This is the kind of power that a superuser wields. Thankfully this isn’t a real computer and we just took a snapshot so nothing is really lost. To restore the VM, first click “Close” under the “Machine” menu, select “Power off the machine” and click “OK”. This forces the VM to stop.
Now the right pane of the VirtualBox window shows the snapshot we just created for the machine. Select it and then click the “Restore Snapshot” button. It may ask if you want to make a snapshot of the current state, but the current state is terrible so you can skip that. Then just click the “Start” arrow again and voilà! We’re back in business.
Shell
Now that the VM snapshot is restored, we’re back to where we’ve just logged in.
After a user logs in to Arch Linux, the kernel automatically runs a program
called a “shell” for that user. While the kernel is a program that works like an
interface for other programs, the shell is a program that works like an
interface for humans. Similar to a kernel, it runs in an infinite loop, waiting
for input. But instead of waiting for program instructions to run, it waits for
text commands from the user. The root@archiso ~ # text with the flashing cursor
is the shell’s way of saying “you just logged into the computer named archiso as
the root user and I’m waiting for a command”—this is called the shell’s
“prompt”.
A text interface (like the one provided by the shell) is often called a command line or a terminal. Command line because of the way you type commands line-by-line, and terminal because older computers used a special machine called a terminal for inputting commands and reading output.
Let’s type a few commands to get a feel for what they look like. The shell can be pretty picky about the input you give it, so try to type things exactly as you see them here.
Moving forward, whenever you see a line that starts with a # like this:
# foo bar
That means type foo bar after the shell prompt and then press
Enter.
# ls -l /usr
# find /etc -name system.conf
# grep -i ps /etc/bash.bashrc
# cp /usr/share/licenses/common/GPL3/license.txt /root
# head --lines=20 /root/license.txt
If you ever get stuck at a point where the shell won’t prompt you for another command, you can press Ctrl+C. This “interrupts” whatever the shell is doing and should force the shell to show another prompt. As a last resort, you can always shut down the VM and restore a prior snapshot.
After each shell command you should see the shell print some text and then another prompt for the next command. This is sometimes called a “read, evaluate, print, loop” or REPL. The shell reads your command, evaluates it (i.e. does something on the computer with the command), prints the result of the command to the screen, and then loops back to the beginning to read another command.
How does the shell read these commands? First the shell looks at the “words” of
the command by splitting up the text on spaces. So grep -i ps
/etc/bash.bashrc/ becomes four words: grep, -i, ps, /etc/bash.bashrc.
The first word is the name of the command and it is usually the most significant
word because it indicates what sort of action the shell is going to perform. So,
for this example, the shell is performing an action called “grep”. The rest of
the words are called the “arguments” of the command and they determine the
specific behavior of the action. The arguments that you are allowed to use
depend entirely on the name of the command being run, which is why the five
different commands above have completely different arguments.
We’ll learn more about these commands and their arguments in a little bit, but
as a quick guide, you can generally group arguments into two categories: options
and filenames. Arguments that start with a - or -- are options: they tell
the specific command (e.g. grep) what sort of thing to do. Options are
(usually) optional and the command will normally perform some default task if
you leave them out. The other arguments (which often contain a /) are the
filenames: they indicate not what the command should do, but where the command
should get its data from. These aren’t hard rules though; sometimes options
don’t start with a - or may contain / like a filename—it depends
entirely on the specific command.
You can think of commands like programs: they take input (their arguments) and produce output (the text printed by the shell) and the output depends only on the input.
But what’s that about “getting data” from a filename. What does that even mean?
File Systems
We already know that computers store data using binary and data formats, but how does a computer distinguish between different sets of data? A hard drive can contain data in many different formats, so how do we say “this audio data” or “that image data” or “the other text file” to the computer?
The solution is another data format called a “file system”.
A file system is a data format which wraps other data formats such that specific chunks of data can be referred to. These chunks of data are called files.
The file system format usually stores information associated with each file (such as a name for the file and its size in bytes) so that you can view a summary of the data at a high level without needing to examine the data format of each individual file. Interacting with the file system is grouped under the I/O category, which means it is managed by the kernel and the kernel provides an interface for other programs to work with the file system.
Let’s jump right in and explore the file system of our VM.
The shell has many commands for working with the file system, but one of the
most important is ls, which lists files in the file system. Try the
following command:
# ls /
You should see this output:
bin boot dev etc home lib lib64 mnt opt proc root run sbin srv sys tmp usr var
Now let’s break down what happened. From what we just learned, we know that this
command is called ls and it has one argument: the filename /. In a *nix
file system, / is a special filename which we call the “root” of the file
system (no relation to the root we logged in as). The root of the file system
is special because it is how we refer to the entire file system at once. So in
English we could read the previous command as “list the files on the file
system”. From the output in the shell, we can see that there are 18 files.
Wait a second, only 18 files? That seems pretty small. In fact there are many
more (thousands) of files in the file system. But rather than storing all of
these files in the root, the file system organizes them so that we don’t get
pages and pages of output when we do ls /. This organization is done using
special files called directories.
A directory is a file which contains no data of its own but instead contains a list of other files on the file system.
ls helps us out here by coloring all of the directories dark blue. That’s
where our other files are squirreled away. And, in fact, we already know how to
list them. I didn’t mention this earlier but that special / filename is
actually the root directory. So now we really understand how ls works: its
argument is the filename of a directory and it outputs the filenames of the
files contained in that directory. To list our other files, we can just use ls
again with the name of one of these other directories.
But if we try this:
# ls etc
we get an error
ls: cannot access etc: No such file or directory
This is because we didn’t specify where in the file system etc is. Remeber
that we found etc by listing /, so the solution is to specify that:
# ls /etc
You should see quite a lot of files in there along with a few directories, for
example systemd. So let’s see what files are in there. Again, we need to
specify where the directory is: systemd is in etc, and etc is in / so
the command is:
# ls /etc/systemd
Notice how we use another / to indicate that systemd is in etc.
In /etc/systemd we see another directory system. Use ls to see what files
are in there, and keep going deeper if some of them are directories. You can
also try exploring some other directories in /.
If any command prints a lot of output, you can scroll through the result by pressing Shift+Page Up and Shift+Page Down.
File systems are a little different in Microsoft’s Windows operating systems. A
minor difference is that they use backslashes \ instead of forward slashes /
to separate directory names. More significantly, the root directory isn’t just
called \, it has a letter name depending on which HDD the files are stored. So
in Windows, C:\Program Files is the path for the directory Program Files
stored in the root of the file system on the HDD named C.
A common analogy for a file system is a drawer in a filing cabinet. In this analogy, files are files, directories are folders, and the root directory is like the drawer itself in which all files and folders are stored.
Working Directories
Now let’s look at /etc, for example. If you ls it, you’ll see that it has
lots of files and lots of directories. What if we want to spend some time
exploring /etc? Won’t it get really tedious typing out /etc over and over
again as we list different directories? Thankfully, the shell can help us out
here. The shell lets us “go into” a directory so that when we refer to filenames
in that directory we don’t need to mention the file system location of the
directory we are “in”. This is purely for convenience, but it really saves a lot
of effort.
The command to “go into” a directory is cd, for change directory.
Let’s do it:
# cd /etc
This doesn’t print any output, but notice that now the shell prompt is different.
root@archiso /etc # _
Now that we are “in” /etc the shell reminds us by putting the directory’s
filename in the prompt.
The directory we “go into” using cd is called the working directory.
So how does the working directory save us time? Well now we can use the special
filename . which means “the working directory”. So the following two commands
are now equivalent:
# ls /etc/kernel
# ls ./kernel
Now you can explore deeper and deeper like so:
# cd ./kernel
# ls .
If you ever lose track of where you are, you can use the command pwd (with no
arguments) to print the working directory.
# pwd
/etc/kernel
So now we can easily explore deeper, but is there an easy way to go back? Yep.
The special filename .. refers to the directory containg our working
directory (sometimes called the “parent directory”). So if you cd somewhere
you don’t want to be, you can back up with just:
# cd ..
Now where it gets really crazy is that you can chain these special filenames
together. So ../.. means the parent directory of our parent directory. And
/etc/../usr/.. is just a really convoluted way of referring to / (verify it
yourself using ls)! Similarly ./././././. is the same as .. To think about
these chains, you can just read them from left to right, and imagine stepping
through the file system as you do so. So when you see ls
/etc/kernel/../netctl/./hooks you can think “go into /etc, then go into
kernel, then go back to the parent directory, then go into netctl, then go
into the working directory, then go into hooks and list the files there”.
A file path (or just path) is a chain of filenames in a file system that describe how to locate a particular file in the file system directories.
Revisiting the cd and ls commands, we see that their first argument is
really a file path.
There is another convenience for making paths just a little nicer to work with.
Previously, all of our paths started with either / or . or ... That’s
because these things tell the computer exactly where to start looking in the
filesystem (the root directory, working directory, or parent directory). But
what if a path starts with none of these things? In that case, the assumption is
that the computer should look in the working directory. So whenever you would
start a path with . you can just leave that part out because that’s where the
computer will look by default. So the following sequence of commands works just
fine:
# cd /
# cd etc
# cd kernel
# ls
From this you might assume that the command cd with no arguments does the same
thing as cd . and changes the working directory to itself (i.e. does nothing).
But you might be surprised to find that you end up here:
root@archiso ~ # _
Where on the file system is ~? Well a quick check with pwd shows us that
we’re actually in /root. What’s going on? On a *nix system, every user has a
“home” directory. This is a directory that belongs to that user and is a place
for them to put personal files. For the superuser that directory is /root.
Just like . and .., ~ is a special filename meaning “my home directory”
and you can use it in paths just as you would expect.
For convenience, cd with no arguments does the same as cd ~ (rather than cd
. which would be pointless).
A file path that starts with the root / is called an absolute path because
it says exactly where a file is in the file system. File paths that start with
. or .. are relative paths because they locate files relative to the
working directory.
Commands
Now that we know how to travel about the file system, let’s look again at some shell commands.
man
Perhaps the most important command of all is man, short for manual. Arch
Linux comes with an extensive manual describing all of the commands (among other
things). To view the manual, simply use the man command with the name of the
command you want to learn about as its argument. For example, to learn about
ls:
# man ls
Or to learn about man itself:
# man man
When you view the manual, the shell switches to a different view called a “pager” which makes reading easier. You can scroll up and down with ↑, ↓, Page Up, Page Down and quit with Q.
Most manual pages are split up into similar sections:
- Name: a very short description of the command
- Synposis: a (confusing) description of all the different ways you can enter the command
- Description: a very long description of the command
- Options: describes all of the options arguments
You may find that some commands organize their manuals differently or have fewer or more sections. Commands can differ in a lot of ways and their manuals often reflect that. As we learn about other commands remember that you can always learn way more by reading the manual.
Additionally, many (but not all) commands accept a --help or -h option which
prints some basic information about the command. It’s worth a shot if you don’t
feel like reading the manual:
# ls --help
ls
We already know a lot about ls but here are a few common features we didn’t
mention. You can list multiple directories at once just by adding them all to
the arguments:
# ls / /etc /usr
Adding the -l option lists one file on each line with additional information
such as the size (in bytes) of the file and when it was last modified:
# ls -l /etc
find
If you’re looking for a specific file somewhere in the file system, it can be
pretty tedious to find it using just ls and cd. find simplifies this task
by searching the file system for you. The simplest usage looks like this:
# find /etc/pacman.d
which simply lists all files in the directory pacman.d and any files in
directories in pacman.d and then any files in directories in directories in
pacman.d, etc. We can then find specific files among these by adding options
that specify what sort of file we’re looking for. For example we can find all
files that have gpg in the filename like so:
# find /etc/pacman.d -name '*gpg*'
Read the manual if you want to know more about it.
cat
Commands like ls and cd care mainly about directories because they focus on
navigating the file system. But most commands are actually designed for regular
(non-directory) files, which is where the computer actually stores data.
In particular, most commands are designed to work with human-readable text data
(in a format like ASCII). cat, short for concatenate, is one of the
simplest such commands. You give it several files as arguments and it outputs
the contents of the files one after another.
# cat /etc/resolv.conf /etc/nsswitch.conf
head and tail
For large files, cat can spew out way too much information. head is like
cat but it only prints the first 10 lines of each file.
# head /etc/services
In the earlier examples we saw how to use an option to print a different number
of lines. The command tail is similar to head but it prints the last few
lines of each file instead.
less
If you have a large file that you want to read, you can use less which takes a
file as its argument and shows its contents in a pager the same way man does.
You can scroll up and down and quit using the same keyboard keys as in man.
less /etc/makepkg.conf
cp and mv
Short for copy, cp takes two paths as arguments, copies the contents
of the file at the first path, and saves the contents at the second path. If the
second path is a path to a directory, it creates a file in that directory with
the same filename as the original file. Otherwise it uses the second path as the
new file name. We used this earlier to copy a text file into /root.
Copying a file to a directory:
cp /etc/fstab /root
Copying a file to a directory but with a different file name:
cp /etc/fstab /root/foobar
mv is a similar command, but it moves the file from one path to
another rather than creating a copy.
mv /root/foobar /root/fizzbuzz
grep
grep is short for global regular expression print, which is
really not a useful mnemonic. What it does is search for text in files. The
simplest use-case looks like this:
# grep word /etc/inputrc /etc/nanorc
which simply prints any lines from /etc/inputrc and /etc/nanorc that have
“word” in them. grep has a lot of useful options that let it do all kinds of
neat stuff, but you should read the manual to learn more about it.
In actuality, grep doesn’t just search for text, it searches for patterns of
text. These patterns are called “regular expressions”, hence the name. The
simplest patterns are plain text like word which just match that exact text,
but we can also use complicated patterns like '\bw\w*d\b' which searches for
any words that start with w and end with d.
Command Types
Now we have a broad idea of what some commands do, but we don’t know how they
do these things. To learn more about them, let’s look at the type command.
Shell commands fall into different categories and the commands in each category
work in different ways. type takes another command as its argument and outputs
the category that command is in (if you include the -a option, it will tell
you if a command is in multiple categories). Try this:
# type -a cd
cd is a shell function from /etc/zsh/zshrc
cd is a shell builtin
What this is telling us is that cd is a special command understood by the
shell program. This makes sense because the working directory is something that
the shell keeps track of for our convenience. When you type cd foo you are
commanding the shell itself to change its working directory—hence “shell
builtin”. But what about other commands?
# type -a man
man is /usr/bin/man
Interesting. That looks like a file path. Let’s do a little test and type these two commands:
# man ls
# /usr/bin/man ls
Weird, right? We typed a file path instead of a command name, but the output was
the same. What’s going on here? When you type a command into the shell, the
shell looks up the command name in each of the command categories it knows. So,
for example, first it might check if man is a shell builtin. If it can’t find
the command in any of its categories, the shell tries one last thing: it looks
to see if the command name is actually the file name of a program. If it is,
the shell tells the kernel the to run that program and passes along the
arguments you provided—which is exactly what happens here with man.
The reason why we can type either man or /usr/bin/man is because the shell
keeps track of which directories in the file system contain programs and
automatically searches all of those directories for the command name we
provided. In fact, most programs on the computer are located in /usr/bin
(bin is short for binary, which is another word for program), so that’s a
good place to start if you want a comprehensive list of programs.
The list of directories that the shell searches for programs is called the
PATH. You can see this list with this command:
# echo $PATH
The different directory paths are separated by :. The directories are searched
in order and the first match is the program that is run. So if there are two
programs with the same file name in /usr/local/bin and /usr/bin, the
/usr/local/bin one will be run when you type its name as a shell command.
You can always get around this search order by typing the full file path to the program for the shell command.
As an example of another command category, try
# type -a ls
ls is aliased to `ls --color=auto'
ls is /usr/bin/ls
An alias is another time-saving feature of the shell. What this tells us is that
when we type ls foo, the shell automatically replaces that with ls
--color=auto foo and then runs the program /usr/bin/ls with those arguments.
This alias is what nicely colors file names for us when we list directories.
So now we know that most shell commands are in fact just names of programs that we want the kernel to run. In the next chapter we’ll take a closer look at how these programs work.
Another convenient feature of the shell is that you can press ↑ and ↓ to scroll through previous commands. This is helpful if you want to correct a typo in a command you ran.
There’s another feature of the shell called “globbing” that saves you time when
typing out multiple file names. What if you want to cat every file in
/sys/devices/system/cpu? You could type them all out
# cd /sys/devices/system/cpu
# cat kernel_max modalias offline online possible present uevent
But there is a much better way.
# cat /sys/devices/system/cpu/*
The * is a “glob”. When the shell sees a glob, it fills it in with any
possible filename that could fit there (if such a filename exists in the file
system). So in this case it looks in /sys/devices/system/cpu and puts each of
those filenames in place of the glob, expanding that one argument into eleven
(one for each file in that directory)! Globs can do some cool stuff. For
example, you can put them in the middle of a file path
# ls /usr/*/share
man
which lists /usr/local/share because local is the only subdirectory of
/usr that contains a file named share. You can also include some letters
with the glob so that you don’t match every file
# cat /sys/devices/system/cpu/o*
which output the contents of the files offline and online since these are
the only filenames that start with “o”.
Another shell feature is autocomplete, which can save you a lot of typing. How it works is when you’re typing either the name of a command or a file path in the shell, you can press Tab to tell the shell to finish typing it for you. So instead of typing
# head /etc/nanorc
You can do
# head /etc/naTaband it will automatically fill in the norc because /etc/nanorc is the only
file path that starts with /etc/na. If there are multiple file paths that
could match, it will type as much as it can. For example
# head /etc/mkiTabexpands to /etc/mkinitcpio because all of the files that start with /etc/mki
also start with /etc/mkinitcpio and it doesn’t know which one you want. If
pressing Tab doesn’t do anything, that is often because there are
already multiple matches based on what you typed. In that case, simply press
Tab again, and the shell will list all possible matches so that you
can keep typing
# head /etc/mkinitcpioTabTabcompleting file mkinitcpio-archiso.conf mkinitcpio.conf mkinitcpio.d/
If double tapping Tab doesn’t do anything, then there are no file names that match what you typed. Autocomplete also combines nicely with the previous tip, globbing. If you ever wonder what files a glob will match before you run the command, autocomplete will tell you. For example
# ls /usr/*/shareTab# cat /etc/ge*TabTab
If there are a lot of matches when you autocomplete, the shell will double check that you actually want to list them.
# gTabTabDisplay all 126 possibilities? (y or n)
You can press N to abort, or press Y to list them anyway and use Enter or Spacebar to scroll through the list.
Graphics
Perhaps you still feel a little weird about the commands and programs we are running because they are so unlike the programs you are used to on your computer. How are these weird little programs with their arguments and text output related to big, fancy programs like your web browser or video games that have nothing to do with a text interface like the shell?
They are actually pretty closely related! Just like how the shell is a REPL running in a loop, reading text input that you type and outputting text to the screen, programs that display graphics (like a web browser) are also a kind of REPL. They run in a loop reading not just text input from the keyboard but also mouse input (so they can see where/what you click on). And rather than waiting for an entire command before evaluating and printing, they run in a very fast loop reading and evaluating input dozens of times per second. This is what creates the illusion that these programs are responding to your input in “real time” even though they are really running in discrete steps just like a shell.
Exercises
-
Read about the following commands in the manual and with
--helpand play around with them to see if you understand their basic functions:echormmkdirrmdiruniqwccutpastesort
Be bold! You can always restore a VM snapshot if you accidentally break something.
-
The shell has an advanced feature called “redirect”. This feature lets you specify that a command’s output should be saved to a file rather than printed on the screen. This is done using a special argument that starts with
>. For example, we can list the files in/etcand save the text to the file/root/etcfileslike so:# ls /etc >/root/etcfilesNote that the redirect argument (with
>) is removed by the shell when it passes on arguments to the programls. Remember that it is the shell itself which redirects output to a file, not the shell command.Using redirects, print the five file names in
/etcthat come latest alphabetically and in reverse alphabetical order (this will require three commands mentioned in this chapter, and two redirects). The output should bezsh xl2tpd xinetd.d xdg X11 -
We’ve seen how many commands read input, perform some task, and then print output. Sometimes you might want to run a command to get some output, then run another command with that output as its input to get new output, then run another command with that new output as its input, etc. One way to do this is using redirects (from the previous exercise): you run the first command and redirect its output to a file, then run the second command on that file and redirect its output to another file, then run the third command on that file, etc.
The shell has another advanced feature to simplify this task, called “pipes”. Pipes let you send the output of one command directly to the input of another command, so that you don’t need to redirect any output to files along the way. All you do is type both commands on the same line separated by
|. For example, sincelslists file names andgrepsearches for text, we can search for the text “bash” in the file names of/etclike so:# ls /etc | grep bashRepeat the previous exercise using pipes instead of redirects.