(BONUS) Digital vs. Analog
All of that digital/analog/discrete/continuous stuff we learned in the formatting chapter might have been a little too abstract. Let’s break it down with a real hands-on example.
This chapter uses a lot of precisely designed images to demonstrate certain concepts. Mobile devices viewing this chapter will sometimes display these images differently than I intended, which kind of defeats the point. If possible, read this chapter using a (non-mobile) computer.
Wallpapers
Most computers these days have the concept of a “desktop”: a main workspace where you can store files or links to programs, and which is covered up by the program windows you open (such as the web browser you are reading this in).
And all of these desktops have a pretty image for you to look at when you have no windows open. These images are often called “desktop backgrounds” or “wallpapers”. You’ve probably seen some of the default wallpapers that come with popular computers. Kind of like your outfit at an interview, your desktop wallpaper is one of the first things people will notice about your computer and it says a lot about what kind of user you are. In fact, you can usually quickly tell whether someone is not a superuser just by looking at their wallpaper. How? Well, surprisingly, it all has to do with that digital vs. analog trickiness.
Images
Last chapter I mentioned how monitors display images using pixels. Pixels are a purely digital concept: you can count the number of pixels on your monitor, and you can’t have half a pixel. Similarly each pixel can only display a certain number of colors, and there are certain colors that they can’t reproduce exactly. However, we usually use monitors to convey analog information: our eyes can’t easily distinguish between tiny pixels or tiny variations in digital color, so we perceive smooth images with smooth colors.
Understanding the difference between digital and analog is essential for having a good-looking desktop wallpaper, and a trained eye can easily pick out when a digital image is not being properly displayed on a monitor.
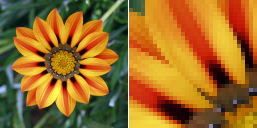
For this chapter, we’re going to use an image of a flower as an example. This image is made of a grid of 158,464 pixels—128 on each side. On the right is a portion of the image zoomed in 4× so that you can clearly see the pixels. Now suppose that we want to use this image as our desktop background. The desktop displayed on your monitor is also a digital image measured in pixels, so our challenge is to fit the pixels of the flower into the pixels of the desktop.
The easiest case would be if our desktop’s resolution is also 128×128.
The resolution of a digital image is its size measured in pixels, usually written width×height.
In that case—where the image and the desktop are the same size—we can simply place each pixel of the image into the corresponding pixel of the desktop. The image will look exactly the same on the desktop as it did on its own. But what if the image and the desktop are not the same size?
Resizing
For example, what if the desktop is too small? We could simply crop the image—remove the pixels that don’t fit on the desktop. We’ll lose some information, but the pixels that are shown on the desktop will be displayed exactly as they were in the original image. This is usually the best option if it still looks good. But what if the desktop is much smaller? What if the desktop is so small that cropping the image would make it look unappealing, thus defeating the point of a desktop wallpaper?
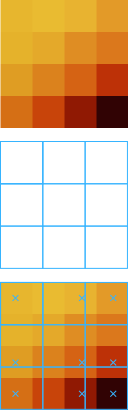
To solve this problem, we need to resize the image to fit the desktop. But this can be surprisingly tricky. To illustrate why, let’s look at just a tiny portion of the original flower image: a 4×4 square. And let’s suppose that our desktop is only 3×3. That means we need to somehow turn 16 pixels into 9 pixels. There isn’t a clear “best” approach to solving this problem. For example, one approach is to simply pick the 9 pixels in the image that are closest to the position of the pixels on the desktop (for, example the 9 pixels marked with Xs in the image on the left). This “nearest-neighbor” approach to resizing has some advantages: the pixel colors in the resulting 3×3 image exactly match colors from the original image and it’s very easy to resize images in this way. However it does have a disadvantage: it simply discards some pixels, which could leave out important details from the original.
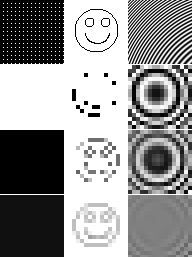
Other image resizing algorithms try to “sample” or “filter” the image, meaning they combine information from several pixels to produce each individual pixel in the result. On the right, we see the flower image resized with three different algorithms (and then zoomed in again to see the individual pixels). Notice how they differ in terms of the pixel colors, which details are most visible, how blurry certain parts appear. For a more extreme example of how tricky image resizing can be, look at the image below it.
This article explains image filters and resizing in (a lot) more detail.
On the top row, we have three different images: a mostly black region with a few white pixels, a crude smiley face, and some curved lines. The rows below that show these three images resized using the same three algorithms we used on the flower image above (and again zoomed in to see the pixels). The first resized example uses nearest neighbor. Notice how it turned the mostly black region completely white! Remember that nearest neighbor only picks one pixel from the original image for each pixel in the result; in this case it picked only the white pixels even though most of the original pixels are black. The smiley face is also completely unrecognizable, again since it didn’t make “good” choices of pixels. The next algorithm—called a bilinear filter—does a bit better: the mostly black region is still mostly black, and the smiley face is closer but still not quite recognizable. Lastly, the Fant algorithm does a great job of preserving both the mostly black region and the smiley face. But what about those rings?
An artifact is an unintentional (and usually undesirable) property in the output of a computation.
In this case, none of these algorithms intend to create rings when resizing an image of curved lines: the rings are an artifact (specifically a moiré pattern). But the real lesson here is that it’s virtually impossible to find an image resizing algorithm that works well in all cases. When we humans look at an image, we see content: things like curved lines and a smiley face. But a computer just sees pixels. It’s very hard to come up with an algorithm that manipulates pixels while preserving whatever content they may represent.
One approach to content-preserving image resizing is called seam carving or liquid rescaling. It tries to identify important areas of the image and then only removes the least important pixels when shrinking the image.
Crop & Resize
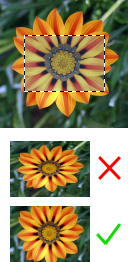
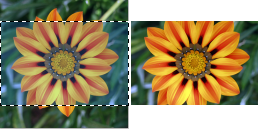
Now for a slight twist: suppose we want to fit our 128×128 flower on an 80×56 desktop. Cropping the image would discard too much, so we just resize… right? WRONG! Our original image is square, but 80×56 is not. Simply resizing the image to the desired size would destroy the image’s aspect ratio.
The aspect ratio of a digital image is the ratio width:height.
The result of blindly resizing is the squished-looking flower on the left. Its natural symmetry has been ruined! The trick is to resize the 128×128 image to 80×80 first and then crop to 80×56. This preserves the aspect ratio while also not removing too much during the crop.
Enlarging

Now what if the image we want for our desktop is too small? We could resize it to be larger: all of the previously discussed algorithms can both shrink and enlarge images. But there is a pretty big difference in this situation. Previously, when shrinking an image, the challenge was how to fit the information from a lot of pixels into a few pixels. You could think of shrinking an image as summarizing an image. Suppose someone told you to summarize a story so that it’s the same story and about half as long. Tricky but doable, right? Now suppose someone told you to expand a story so that it’s the same story but twice as long. Way, way harder, right? What additional information do you insert?
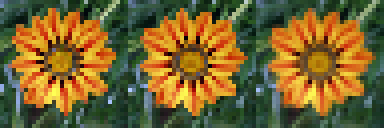
Summarizing information while keeping the same content is much simpler than adding information while keeping the same content, and this is reflected in image resizing algorithms. On the right, there are a few examples of a portion of the flower image enlarged to twice its original size. Take a moment to examine them and pick out which one looks the best.
Which one did you choose? Hopefully the third one—if not you should go back and look more carefully. The others look blocky or blurry, right? Compared to the third one they almost make your eyes hurt, like your monitor is out of focus or something. Well, guess what: all of the images are enlarged except for the third one! That one is just a cropped higher-resolution image of the flower. The lesson here is that if you need a bigger image, find an image that was big to begin with. Don’t resize a smaller image. Only in rare cases or when the enlargement is very subtle (like if your wallpaper is just a few pixels too small) will the visual quality not be ruined by enlarging.
A completely different approach to digital images that avoids this enlarging problem is vector graphics. Instead of encoding images using pixels, vector graphics encode images using shapes described by mathematical formulae. These shapes can then be drawn using pixels at whatever scale is desired.
Compression
The most common image formats these days use 24 bits (3 bytes) to store a single color. Since each pixel of an image can be a different color, the size of a digital image in bytes is just width×height×3. One of the most common resolutions for a computer monitor these days is 1920×1080, meaning that most desktop wallpapers are going to take up 1920×1080×3=6MB of space on your hard drive (remember that’s megabytes i.e. over 6 million bytes). That’s actually a pretty hefty size for just an image, so do we really need all 6 million bytes?
An image stored as a simple list of colored pixels is called a bitmap. Bitmaps are commonly used behind the scenes in computers to manipulate and display images, but they are unpopular for image storage due to their large size.
Suppose that you want to use a silly wallpaper that is just plain red. Every pixel is the exact same shade. To store that image as a bitmap, you simply store each red pixel. As a digital description of the image, that’s kind of like saying “The pixel in the top left corner is red, and the one next to it is red, and the one next to that is red, and the one… and the leftmost pixel in the next row is red, and the one next to it is red, and…” It’s a bit silly, right? Why not just say “All 6 million pixels are red”? This is a good example of where compression is useful.
Compression is any method of reducing the amount of data required to store the same amount of information.
For our example, we can imagine a format as follows: if the first byte of the data is 00, then we simply store the image as a bitmap; if the first byte of the data is 01, then we list the image’s width in pixels, the image’s height in pixels and then just one color for all the pixels of the image. For our all-red image, we can encode it two different ways using this format: with the first byte being 00 or the first byte being 01. The former would require 6MB as before, but the latter would require only about 8 bytes (2 each for the width and height). That’s a huge reduction in size!
Of course this is a very simplified example. Our image is particularly easy to compress, and our format for compressing it is especially designed to handle it well. However there are general image compression formats (such as PNG) that can offer significant data savings for a wide variety of images. And they work in roughly the same way as our simple algorithm: they find patterns in the image data that can be described more efficiently than by just listing each pixel’s color.
Loss
So what does compression have to do with choosing a nice desktop background? Well, I made a little lie earlier. I said that compression stores the same amount of information with fewer data, but the truth is a bit fuzzier. Remember that although computer images are stored digitally, they often represent analog information (like photographs of real objects). Since we interpret analog information using our imperfect brains and sensory organs, there’s actually quite a lot of wiggle room when it comes to storing the “same” amount of information.
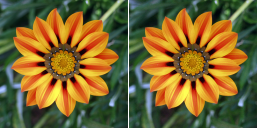
For example, take a look at the images on the right. What differences do you see? Really there is no difference as far as we humans are concerned, but a computer would see the two as completely different—I subtly altered every single pixel of the original image.
If our eyes are not sensitive enough to distinguish between two very similar digital colors as in this case, why bother storing them as different colors at all? In other words, why not removing subtle information that we can’t see by replacing similar colors with just one color? Compressing in this way—by removing unimportant information—is called “lossy” compression and it usually offers even greater savings of data size than the previous “lossless” compression. JPEG (or JPG) is a common lossy image compression format.
With a lossless compression algorithm, there isn’t much choice involved: all of the information must be preserved, so the algorithm will simply compress the image as much as it can. Lossy compression is different. Since it works by removing information, most lossy compression algorithms offer a choice of how much information to remove in order to compress the image. However this choice can make lossy compression dangerous. It can be notoriously difficult to find the “right” level of compression which achieves a good balance between reduced size and image quality. Many programs take a naive approach and simply compress all images equally—which is guaranteed to result in artifacts in certain cases. Again, it comes down to computers not understanding image content as we humans do. It takes a human eye to determine what level of compression is correct.
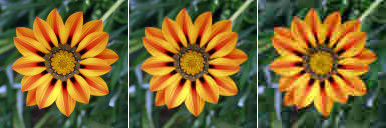
On the left we see the flower image compressed three times with different degrees of compression. The original uncompressed image takes up 128×128×3=49KB. The leftmost compressed image is nearly indistinguishable from the original and yet uses about a fifth of the data: 10KB. The next image is even smaller—only 4KB—but visual artifacts are more apparent (look near the edges of the petals or in the very center of the flower). And the last image is again even smaller (2KB) but now the visual quality is almost completely ruined.
When choosing a desktop image, be especially careful if it comes in a lossy format like JPEG. Keep an eye out for visual artifacts resulting from overcompression.
Compression artifacts aren’t always a deal-breaker, however. If an image has artifacts but is much larger than you need it to be, shrinking the image can sometimes hide the artifacts completely. Intuitively, artifacts are a result of not having enough information to fill the resolution of the image, thus reducing the image resolution can actually improve the quality.
We’re talking about compression of images here because I have a pet peeve for ugly desktop backgrounds, but compression is a general tool that can be applied to any sort of digital information. For example, ZIP is a popular lossless compression format that works with any kind of data, and MP3 is a popular lossy format for digital audio.
Native Resolution
There is one last challenge when it comes to displaying digital images, and it lies within your monitor itself. The pixels that monitors use to display images are set in stone—there is no way to increase or decrease the number of pixels that your monitor has. But this can make computer programmers’ lives difficult, because there are so many different monitors in the world and they all have different numbers of pixels and thus different resolutions. In some cases, it can be very hard for programmers to create programs which work well on every monitor so instead they design their programs to only work with certain monitor resolutions.
That could be bad news for monitor manufacturers, since some of their monitors might not be able to run these programs that require a different resolution. To get around this, most monitors have a feature to “fake” a different resolution. For example, if a monitor has a resolution of 1920×1080 and a program only works with the resolution 1024×768, the monitor can fake the smaller resolution either by displaying a small image with black pixels filling in the extra space, or by resizing the small image to fit its actual 1920×1080 resolution.
The resolutions that your monitor can display (including the fake ones) are called supported resolutions. Whereas the actual resolution of your monitor (which corresponds to the number of pixels it has) is called the native resolution.
Earlier we learned how enlarging digital images is usually a big no-no, so using a non-native resolution for your monitor often is as well. You can go through all the effort in the world to prepare an image to look perfect for the size of your desktop, but if your desktop is then enlarged to display at a non-native resolution on your monitor all of your effort is wasted.
Exercises
- Find out your monitor’s native resolution and ensure that your desktop is also using that resolution.
-
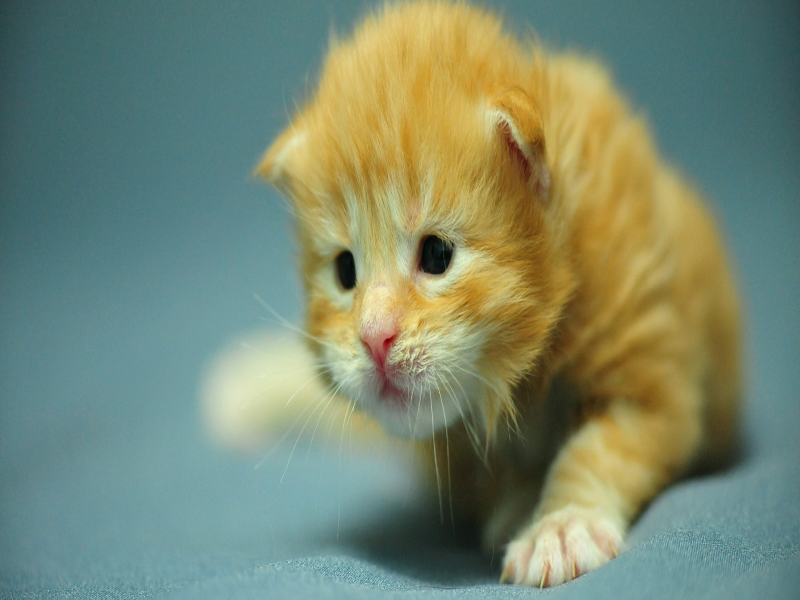
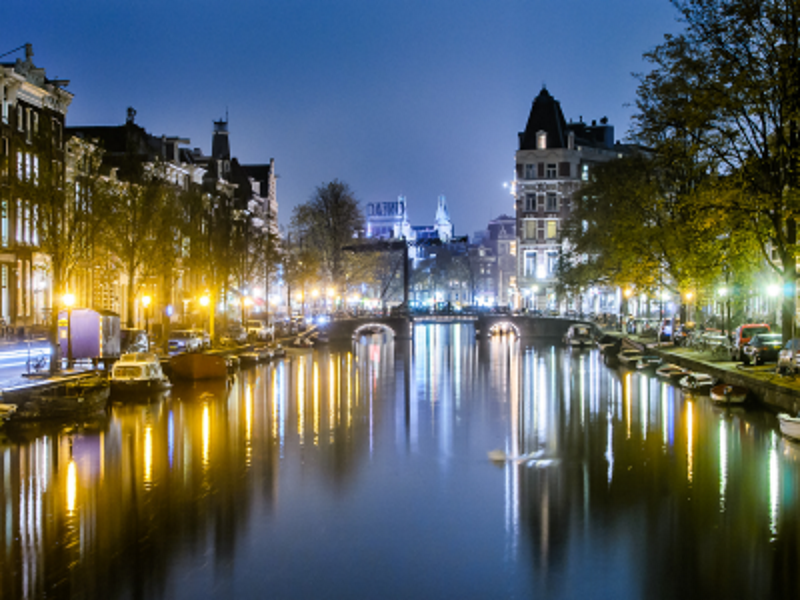
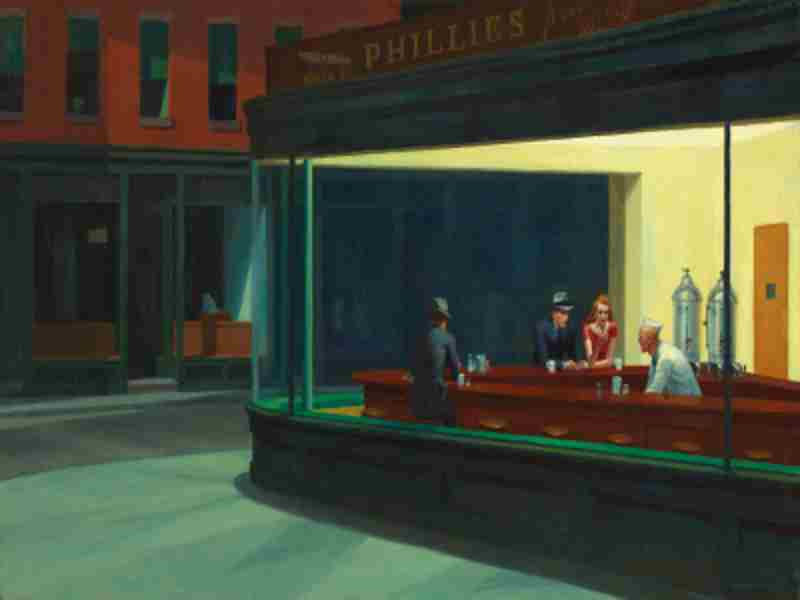
The following images are wallpaper candidates for an 800×600 desktop. For each image, name which problems it has (if any) that would make it a bad wallpaper.